Friday, July 26, 2013

Blueberry Crumb Bars

One of my friends and I went blueberry picking this morning. The berries are hanging on the bushes like grapes, but all are not quite ripe yet. We picked about 5 quarts of berries and plan to go back in a week when they should just roll off the branches into the buckets! We are hopeful.

Michelle, www.browneyedbaker.com, posted this recipe and it looks so yummy that I just lifted it for you and reposted it here. Michelle, I hope this is OK. If not, I apologize now! If you've not visited Michelle's blog, you need to! She has excellent recipes and is so very organized.

This afternoon I baked these bars. They are quick and easy and taste delicious. My husband will, of course, top his with ice cream. I think you'll like them, too!

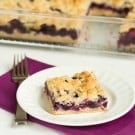
BLUEBERRY CRUMB BARS


yield: 20 to 24 bars
 
prep time: 20 minutes
 
cook time: 50 minutes
 
total time: 1 hour 10 minutes
Crumb bars loaded in the middle with fresh blueberries.

INGREDIENTS:


For the Crumb:
3 cups all-purpose flour
1 cup granulated sugar
1 teaspoon baking powder
¼ teaspoon salt
1 cup cold unsalted butter, cut into small cubes
1 egg


For the Blueberry Filling:
4 cups fresh blueberries
½ cup granulated sugar
4 teaspoons cornstarch
Juice of one lemon

DIRECTIONS:

1. Preheat oven to 375 degrees F. Lightly grease a 9x13-inch baking pan.
2. Make the Crumb: In a medium bowl, whisk together the flour, sugar, baking powder and salt. Use a fork or pastry cutter to blend in the butter, and then the egg (the dough will be crumbly). Press half of dough into the prepared pan.
3. In a separate large bowl, whisk together the sugar, cornstarch and lemon juice. Gently fold in the blueberries to coat evenly with the sugar mixture. Spread the blueberry mixture evenly over the crust, drizzling any excess juice in the bowl over the filling. Crumble the remaining dough evenly over the blueberry layer.
4. Bake for 45 to 50 minutes, or until the top is light golden brown. Cool completely before cutting into squares. Leftovers can be stored in an airtight container or wrapped in plastic wrap at room temperature or in the refrigerator.

Sunday, July 21, 2013

Herb Salt

Do you sometimes feel like smacking yourself on the forehead and saying " duhhhhh!"? Today was one of THOSE days! Permit me to go back and set the stage and I believe you will agree.

Last fall when we were in Provence, I bought a wonderful sea salt and herb blend similar to Herbs de Provence. I've used it sparingly since coming home, rationed it and on some days, simply opened the jar to whiff those smells so distinctive to that part of the world. Then I began to dissect the contents. Then I began to Google herb salts..... Then I began to feel very foolish! It was the duhhhh moment!

When I looked around my "yard" ( We live in the mountains of NC on a mountain, so I use that word loosely.) I saw several of the herbs in the herb salt. As a matter of fact, I have a rosemary bush that started out 9 years ago as a 1 quart pot holding a tiny sad looking little sprig.  Today it is 4 feet wide and 3 feet tall! Welll.... Maybe not quite as large after I trimmed it this afternoon!

The house smells scrumptious! The herb salt is on the counter drying and my forehead is sore!
Here's what I did. This is almost too easy!


Herb Salt
1/2 cup Kosher or sea salt
4 cloves garlic, peeled and halved
4 cups fresh herb leaves, washed and dried ( rosemary and sage were my choices)

Place 2 tablespoons salt in the food processor. Add garlic and process until finely chopped. Add herbs and remaining salt. Process until consistency of wet sand. If you want the salt more chunky, save out half of it to stir in after processing the herbs. Spread it on a glass dish (I used a platter) and let sit on the counter for several hours to dry. Scoop into glass jars ( or cute bottles available at craft stores), label and store at room temperature.


Sprinkle over cooked veggies, baked potatoes, fresh sliced tomatoes, focaccia (before baking), eggs, omelets....... Etc, etc.....

Confession: I tried drying a batch in the oven for 30 min at 350 degrees. Can you smell the burned salt and herbs! Yuck! Just let it dry on it's own!

What a great hostess gift! I will forever keep some on hand! And it only cost pennies to make!


Friday, July 19, 2013

Chocolate Chess Pie

Chocolate Chess Pie

Isn't it about time for something rich, gooey and chocolate?  I baked this Chocolate Chess Pie recently for a friend recuperating from a medical procedure and she pronounced it "to die for". Growing up in the South meant pies almost every weekend. When there were no fruits in season, the pies were more basic and included Egg Custard, Pecan, Lemon Chess and Chocolate Chess. Unfortunately, I did not learn the fine art of pie crust making. When frozen pie crusts came about, Mama jumped on them and I don't believe she ever made another pie crust from "scratch". I followed suite.
Actually, I don't even particularly like pie crust and have been caught eating the filling and leaving the crust. But don't tell anyone, OK. 

Chess pies are very rich. No wonder! The ingredients are sugar, eggs, butter and maybe cream and something for flavor. Sometimes just the rich buttery flavor is enough. This one happens to be a very rich chocolate, is easy to make and will " wow"  your friends! Go out and buy a frozen pie crust and whip this one up for dinner tonight.

Chocolate Chess Pie
1   1/2 cups sugar
1/4 cup unsweetened cocoa
Pinch of salt
2 eggs
1/4 cup melted butter
1 (5oz.) can evaporated milk
1 teaspoon vanilla extract
1 unbaked (9-inch) pie crust

Preheat oven to 350 degrees. Combine sugar, cocoa and salt. Mix well and set aside. 
Combine eggs, butter, milk and vanilla in a large mixing bowl. Beat well. Add sugar mixture and mix well. Pour filling into a 9-inch pie unbaked pie crust. Bake for 45 to 50 minutes. Cool to room temperature before slicing. 

You can top each slice with whipped cream, if desired. Serve small slices! Warning! This is VERY rich! 

Sunday, July 14, 2013

Sweet Summer Peaches


There is a bowl of peaches sitting on my kitchen counter and every time I pass by it I get a whiff of the most delicious smell of summer! Fresh peaches eaten out of hand with juice drooling down your arm or fresh peaches dressed up for dinner are both a special treat and best eaten in the warm summer months. However, every summer I freeze enough peaches for a cobbler or two in the cold winter time ( usually my birthday treat in January! ). While they are abundant and deliciously ripe, try one of these yummy recipes. 


Peach Cobbler
4 cups fresh ripe peaches, peeled and cut into bite-size pieces
1 cup sugar
1 stick butter (REAL butter, unsalted)
1 cup self-rising flour (or 1 cup all-purpose + 1 1/2 teaspoons baking powder + 1/2 teaspoon salt)
1 cup sugar
1 cup milk
1/2 teaspoon fresh lemon juice
1/4 teaspoon ground cinnamon

Preheat oven to 375 degrees.

Combine peaches and 1 cup sugar in medium saucepan. Cook over medium heat until mixture boils. Remove from heat. Set aside.

Place butter in 2-quart baking dish. Place in oven and heat until butter melts. While butter melts, combine flour,sugar, milk,lemon juice, and cinnamon in a medium mixing bowl. Stir just to combine. Pour mixture over melted butter. Pour peach mixture over batter. Bake for 40 minutes. Serve warm with ice cream!!


Peach Puffs
1 large or 2 medium peaches, peeled and sliced
2 teaspoons sugar
1/4 teaspoon ground cinnamon
1 sheet frozen puff pastry, thawed according to pkg. directions
 1/4 cup King Arthur Almond Schmear
Vanilla ice cream

Preheat oven to 400 degrees. 

Combine peaches, sugar and cinnamon in a small bowl. Set aside. Cut thawed puff pastry into 6 rectangles. Place rectangles on a parchment lined baking sheet. Spread each rectangle with Almond Schmear. Top with peach slices. Bake for 20 minutes or until peaches are tender and pastry is lightly browned. Serve warm topped with vanilla ice cream.

If you're really ambitious, try making the pastry yourself. Here is the link to the recipe from King Arthur Flour. You can count on them for excellent products and dependable recipes. http://www.kingarthurflour.com/recipes/raspberry-puff-turnovers-recipe


Friday, July 12, 2013

Squash Casserole


Rain, rain, rain! Have you noticed that we're having a cool wet summer? I can handle cool, but wet! Ugh! Our joint plot in the community garden is just sitting there waiting for sunshine. Except for the squash! It seems to LOVE the rain and has yielded zucchini the size of my leg and yellow squash almost as big! Surprisingly, they are tender and tasty. I've made a number of new recipes using both types of squash and even used a combination of the 2 for the following casserole.  I like this casserole because it doesn't have any eggs and has a nice texture. I'm not a huge fan of squash casseroles, but I like this one. Hopefully, you will too! 

Squash casserole

1  cup water
2  lbs yellow/summer squash, sliced
1/2 cup chopped onion
1  teaspoon salt
1/8  teaspoon sugar
3  Tablespoon  unsalted butter, softened
1¼  cups shredded sharp Cheddar cheese
1  cup sour cream
1/3  cup shredded Parmesan cheese, optional
Salt and pepper to taste
1  cup crushed Ritz cracker crumbs
3  tbsp butter, melted

Preheat oven to 350 degrees F. Bring the water to a boil in a large saucepan, then add the squash, onion, salt and sugar. Cook over moderate heat, covered, for 20 minutes (or until tender).
Drain well and return squash mixture to pan. Add softened butter and mash with a potato masher or fork until squash is broken apart but not entirely mashed. Drain off water. Stir in cheese, sour cream, Parmesan, salt and pepper to taste.
Combine cracker crumbs and melted butter in a small bowl.
Pour the squash mixture into a buttered  11-inch gratin dish ( or 2 quart casserole) and top with the crumb mixture. Bake for 20 to 30 minutes, or until bubbling and golden. Let sit for 5 minutes before serving.

Wednesday, July 10, 2013

Southwest Chicken Salad


Summer is grilling time at our house. McCormick has a quick and easy line of dry marinades in envelopes that you add oil, water and vinegar to reconstitute. Grill Mates come in a variety of flavors; I keep a variety on hand including our favorites Baja Citrus, Mojito Lime and Garlic, Herb and Wine. In addition to being quick to mix up, the meat only needs to marinate for 15-30 minutes. Whenever we have a break in the rain, we heat up the grill and cook extras. We had leftovers from July 4th and I was ready for a new flavor combination. Here's what came out of leftovers from our refrigerator.

Southwest Chicken Salad
1 grilled marinated chicken breast, chopped
1 ear corn on the cob, cut off the cob
6 cherry tomatoes, halved
1/4 cup chopped Vidalia onion
2 teaspoons lime juice
2 tablespoons chopped cilantro
1/4 teaspoon cumin, optional
1/4 cup mayonnaise
1/4 cup sour cream
2 Tablespoons salsa
Tortilla chips

Combine ingredients. Serve chilled with tortilla chips. 

Monday, July 8, 2013

Lemon Blueberry Bread

This past weekend I had a houseguest and a busy schedule. I was looking for a yummy quick bread with a shortcut. This Lemon Blueberry Bread was just the answer. It became more moist after a couple of days and the lemon flavor intensified. Lemon and blueberry is a delicious flavor combination and this Lemon Blueberry Bread was a hit! Give it a try while blueberries are in season and plentiful!


Lemon Blueberry Bread


1 (8 oz.) pkg reduced fat cream cheese ( or regular)
1⅓ cup sugar, divided
2 eggs
1 tablespoon lemon extract
cups Bisquick
1 tablespoon grated lemon rind
cups blueberries
cup fresh lemon juice

Preheat oven to 350 degrees. Coat 9x5x3 nonstick loaf pan with Pam.

In large mixer bowl, combine cream cheese and 1 cup sugar. Mix until light and fluffy. Beat in eggs and lemon extract. Stir in baking mix and lemon rind just until blended. Fold in blueberries. Transfer batter to prepared pan. Bake 50-60 minutes or until wooden pick inserted in center comes out clean.

Immediately poke holes in 1 -inch intervals on top of bread with toothpick. In microwave safe dish combine remaining 1/3 cup sugar and lemon juice. Heat until sugar is dissolved. Pour evenly over bread. Cool, remove from pan and slice. 

Sunday, July 7, 2013

Lemon Basil Shortbread Cookies

Early last spring, my daughter and her husband took us to the Atlanta Botanical Garden. The tulips were blooming and I took beautiful photos that will ( one day) make perfect painting references. As we exited, we ran into a small bazaar type sales area. Everything appeared to be homemade. I immediately spotted a chef with cookies beautifully displayed. They were shortbread. Not ordinary shortbread, but interesting herb flavored shortbread. I couldn't resist and bought a package for my friend and me to share and dissect!

The flavor of the day was Ginger and Rosemary. I tasted and chatted with the chef. He told me he was working on Lemon Basil. Not to be outdone, I came home and immediately searched the internet for a recipe! Of course, there were several! I chose one and tried it myself. They are scrumptious!

Here's the recipe with some notes from my experimenting (surely you expected that?). I hope you enjoy them as much as we have.


Lemon Basil Shortbread (adapted from Ina Garten’s basic shortbread)

1 cup white sugar
3 sticks unsalted butter, softened
3 1/2 cups all-purpose flour (plus slightly more, if needed – see below)
1/4 teaspoon salt
1/2 teaspoon pure vanilla extract
1  1/2 teaspoons lemon zest, finely chopped 
2 tablespoons freshly squeezed lemon juice 
2 tablespoons finely chopped fresh basil leaves

I added these ingredients from King Arthur Flour Company
1 T lemon juice powder
1 heaping tablespoon lemon bits

Cream butter and sugar on medium speed of electric mixer until light and fluffy.
Add vanilla, lemon juice, lemon zest, and basil. Mix on low until well combined. Sift  flour and salt together; add gradually to the creamed mixture with the mixer running on low.

Note: The original recipe calls for 3 1/2 cups of flour and is the perfect amount to pull all of the dough off the sides of the bowl and make a ball.  However, with so much lemon juice in this recipe, we had to add just a bit more flour (maybe even less than a 1/4 cup) to get the dough to pull nicely and cleanly off the sides of the bowl and become well incorporated into a ball.  So, start with the 3 1/2 cups of flour, but if that is not enough to pull the dough cleanly off the sides of the bowl – you should not have any loose bits sticking to the bowl – then add just a sprinkle at a time until you get that nice clean bowl.  

Remove dough from bowl and mold into a thick disc.  Cover and refrigerate for at least 2 hours or overnight.

Remove the dough from the fridge and roll it out so that it is about 1/2″ thick.  (If you left the dough in the fridge overnight, you may have to give it half an hour or so before it’s able to be rolled out). Use your favorite cookie cutter and cut the dough into cookies.

* I shaped the dough into a log, rolled in plastic wrap and refrigerated for several hours. Slice into 1/4" circles and bake for 10 to 15 minutes on ungreased baking pans.

Place the cookies directly onto a baking sheet, no greasing required.  In an oven that has been preheated to 350 degrees, bake the cookies for about 20 minutes, until the edges start to brown nicely.

Wait for about a minute, then carefully remove the cookies onto a cooling rack.  With the higher moisture content in this particular recipe, we’ve found that they may be flaky at first, but as they cool they will firm up nicely.

Wednesday, July 3, 2013

Back in Business!

Dear Friends,
In case you've wondered where I've been.... I've been caught in a black hole in tech world! My email was hacked, my ebay account was hacked and my blog was frozen. Ok, that is not a technical term, but for months now I've not been able to access my account to post! Today was my last effort and VIOLA! I got in! I have absolutely NO idea how or why, but here I am!

With so many blogs out there and so many folks on Pinterest, I'm not sure you have time to read posts from me. Please let me know by commenting on this post whether to continue with The Southern Cook blog or put it to "bed" for good. As ALWAYS with me, No is an OK answer!

Love and hugs to all!
Helen